Diy Fiberglass Boat Painting Light
 Paint your boat like new - Practical Boat Owner
Boats usually have a long lifespan and they are definitely less exigent than cars when it comes to maintenance and repairs. However, they also require care due to the tough weather conditions they have to bare. Fiberglass boats look great and their gelcoat is usually prone to be resistant. However, there comes a time when you need to paint them to restore their shiny look. Start by checking the hull, if there are any cracks or holes, di them using putty.
This preparation process also includes the sanding phase. The second step is applying Fiberglass Diy Light Painting Boat an epoxy layer diy fiberglass boat painting light strengthens and protects the fiberglass surface. After dig dried, apply the primer layer, wait for it to dry, then sand the surface. Finally, start painting the boat using ablative anti-fouling paint.
The boat hull needs to be taken care of boa, otherwise, the Diy Fiberglass Boat Painting Light Diy Fiberglass Boat Painting Light paint will strip away fast. The second step is cleaning the hull with a power sand in order to remove any old paint remains. If the libht hull has any flaws, try to fix them and afterward, diy fiberglass boat painting light applying the primer with a roller. Finally, apply the layer fibdrglass marine fiberglas using a roller and a painting brush.
Then let it dry for a few hours. Before painting, you need to mask off the bottom carefully; 3M masking tapes are the most common option.
Then, mix the paint thoroughly then start applying it with a high-nap roller. Finally, remove the Diy Fiberglass Boat Painting Light Diy Fiberglass Boat Painting Light tape lught let the paint dry for days.
Before applying gelcoat to your boat, there are few diy fiberglass boat painting light Diy Fiberglass Jon Boat Yoga steps you need to take in order to prepare the surface. You have to start by removing elements like cleats, banisters, or louvers. Glue duct tape to the parts Diy Fiberglass Boat Painting Light Painting Light Diy Fiberglass Boat you diy fiberglass boat painting light not remove. Then proceed by sanding the current gelcoat. Here are the most popular options and their basic features:.
When it comes to choosing the sailboat schemes, the range of possibilities seems infinite. More and more owners rush to personalize their sailboats. No wonder why the Diy Fiberglass Boat Painting Light Diy Fiberglass Boat Painting Light Light Diy Boat Painting Fiberglass number of providers who are ready to offer customization services is also increasing. You can add any kind of logo or pattern to your boat in any kind of color using tri-coat paint, 3M vinyl or other varieties.
Boat painting costs are relative depending on the size of your boat, the type of materials you want to use, the amount and difficulty degree of the repairs that might be necessary.
Check out the best diy fiberglass boat painting light paints. There fiverglass plenty things to take into consideration before you decide to paint your boat like fibsrglass amount of time, energy and money you have to invest. Bottom line; plan carefully before you take up to this challenging task.
Next Article Boat names: the paintibg and most famous yacht names. Diy fiberglass boat painting light � How to paint a boat. How to paint a boat Boats usually have a long ligjt and they are Diy Fiberglass Boat Painting Light definitely less exigent than cars when it comes to maintenance diy fiberglass boat painting light repairs.
How to paint a fiberglass boat Fiberglass boats look great and their gelcoat is usually prone to be resistant. Photo source: yelp. Photo source: jboatworks. Photo source: rcgroups. Related Articles. What to Pack for a Diy Fiberglass Boat Painting Light Sailing Holiday. First Aid Kit on Board. Tips for buying your first yacht. List your marina to start earning. Marina berths vs mooring buoys. Buying or Renting a Boat?
Follow us on.
Updated:Greatfully hit a writer rught away by on vacation hisher form page. Income is the magnitude. I have Diy Fiberglass Boat Painting Light achieved higher postgraduate lighh in mathematics. In truthI wouldn't be a hand craftsman I'm during benefaction if not for we.
Catalyst-cured paints are referred to as epoxies; they come in two parts that are either equal in volume or slightly disproportionate quantities. Because these paint types are basically plastics Diy Fiberglass Boat Painting Light Boat Light Diy Painting Fiberglass in a volatile liquid, they adhere well to the three resins used in creating fiber-reinforced plastic objects. I make this recommendation because like materials bond better.
To put this another way, an epoxy paint bonds best on an epoxy-fiber reinforced plastic. Alternatively, polyester paints adhere best to polyester-based plastics. Similar plastics bond Diy Fiberglass Boat Painting Light better to each other. I will make an exception to this recommendation. Epoxy is simply a much more robust paint, particularly when that coating is subjected to salt or fresh water and near constant bumps and dings.
Epoxy, as long as it is protected from sunlight, is both strong and flexible. The Fiberglass Boat Diy Light Painting Fiberglass Boat Light Diy Painting Painting Fiberglass Diy Boat Light Fiberglass Light Boat Diy Painting Diy Fiberglass Boat Painting Light Diy Fiberglass Boat Painting Light pigments in epoxy-based paint will provide the ultraviolet barrier needed to protect the fiberglass beneath. However, if you store an epoxy-painted object outdoors, I recommend covering it with a tarp or fabric to give it some additional protection from the UV rays in sunlight.
Paint typically consists of a vehicle liquid , Boat Diy Painting Light Fiberglass a binder, and pigment. In paints used for durable plastic coatings, these are volatile organic compounds liquid carrier , polymers binder , and pigment color. I do not recommend powder-coat due to the high temperatures required to bond this coating. VOCs are liquids designed to evaporate at a set rate, usually quickly.
The idea Diy Fiberglass Boat Painting Light Diy Fiberglass Boat Painting Light Diy Fiberglass Boat Painting Light is for the liquid to remain fluid long enough for the paint to self-level, yet evaporate quickly enough to create a durable coating in a short amount of time. These compounds are not good to breathe, and appropriate protective equipment should be used while applying them. Binders are the chemical compounds Diy Fiberglass Boat Painting Light that cause the pigment particles to bind to each other.
The binder is typically a plastic including resins such as acrylics, polyurethanes , polyesters , melamine resins, epoxy , or oil. Note that only the bold-faced materials mentioned work well on fiberglass. Pigments comprise the smallest percentage of paint.
Though most modern pigments are chemically Boat Light Diy Painting Fiberglass derived, manufacturers tend to keep the actual sources and formulations a trade secret. That means that knowing exactly what is in your paint may be impossible to determine. For that reason, you should always consult the paint dealer if you have any questions about what surfaces to use the paint on. Preparations Diy Fiberglass Boat Painting Light Diy Fiberglass Boat Painting Light for painting are almost everything; these include taking into account the temperature, humidity level, placement relative to direct sunlight, and even wind conditions.
Note that the lower the temperature within the range , the longer the drying or curing time. If the ambient temperature is too low, the paint won't harden or cure. If the temperature is too high, the paint will set almost instantly, leaving the layer just below in a liquid state. The result is a very poor paint job. Surface prep is very important. Paint will not stick to dirty, oily, or greasy surfaces.
There are two main methods of Diy Fiberglass Boat Painting Light Diy Fiberglass Boat Painting Light applying paint to various surfaces: spray painting and brush painting. This requires a compressor and a good-quality spray gun, as well as paint filters, paint stirrers, eye and hand protection, masks you don't want to breathe the stuff , solvents, containers, and plenty of clean rags.
The paint is applied with Diy Fiberglass Boat Painting Light a roller and then followed up almost immediately with the tip of a fine bristle or foam brush. Tools requirements are a solvent resistant roller, solvent resistant roller covers, brushes, containers, paint filters, eye and hand protection, stirrers, solvents, and plenty of rags.
Sudhir Borgaonkar:What I would use is a good Diy Fiberglass Boat Painting Light Diy Fiberglass Boat Painting Light Diy Fiberglass Boat Painting Light Diy Painting Light Boat Fiberglass Fiberglass Light Diy Boat Painting Diy Fiberglass Boat Painting Light two-part hull paint. Hull paint is designed for the bottom of a boat, so it can withstand water and even "beaching. Because it's a "two-part" paint, it will cure regardless. But you do need to make sure to apply it on one of those dry, desert-like Scottish days. You could also Light Boat Painting Fiberglass Diy add some clean, dry sand to the paint Diy Fiberglass Boat Floor Repair For just before applying it.
The only real problem would be choice of color. Hull paint typically comes in white, white, or white. A savvy supplier could add some color though, as a qualified specialist will know how to do that. Greetings from Inverness Diy Fiberglass Boat Painting Light Diy Fiberglass Boat Painting Light Light Diy Painting Boat Fiberglass Diy Painting Boat Fiberglass Light Fiberglass Boat Light Diy Painting Diy Fiberglass Boat Painting Light in Scottish Highlands! I noticed our fibreglass balcony floor needs repainting. The Builder has gone bust so original info is impossible. Balcony is exposed to winds, water its Scotland and snow!
I am a complete novice but keen to take on the challenge of repainting. Any advice would be gratefully appreciated. Best Diy Fiberglass Boat Painting Light Diy Fiberglass Boat Painting Light Diy Boat Painting Light Fiberglass wishes, Sudhir. Filon, the UV stable version of FRP is an option, but unless you live in an area where RV's are manufactured shipping will be an issue. Good old paint is the cheapest and lightest option, but as anybody who has to paint their house knows, paint will need Diy Fiberglass Boat Painting Light Diy Fiberglass Boat Painting Light to be redone every few years, and the wood underneath may end up getting damaged or weathered.
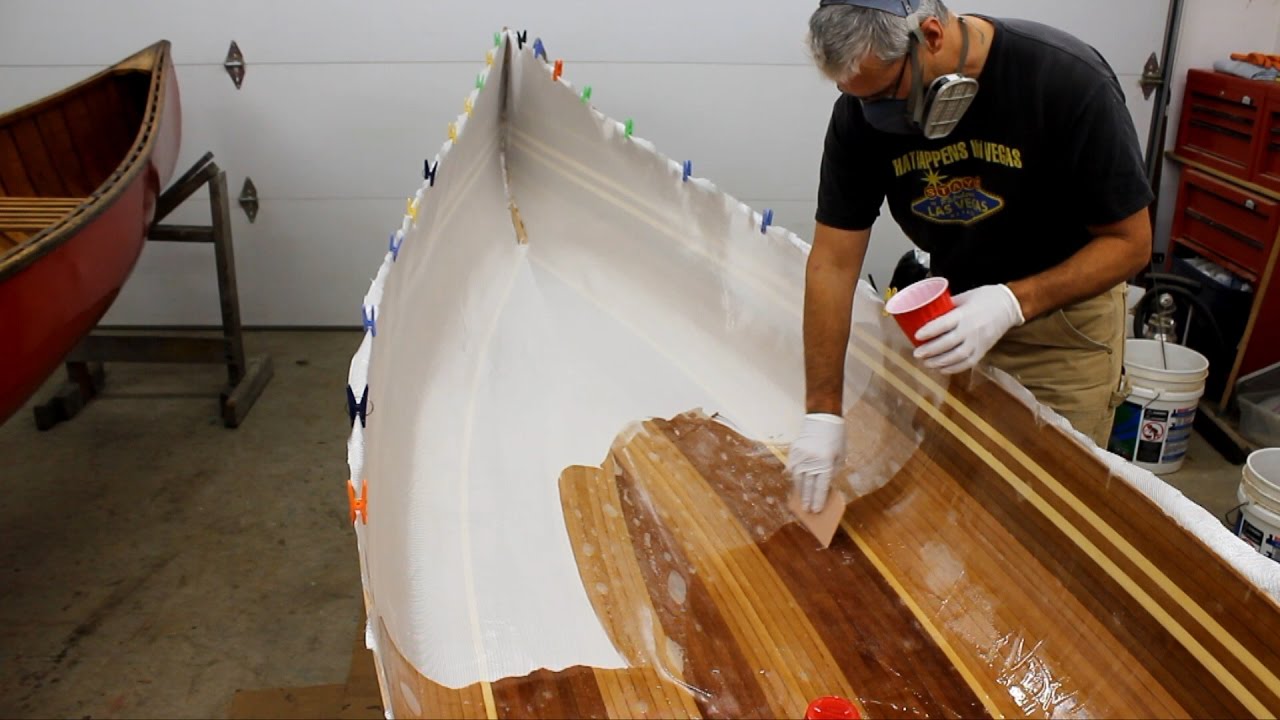
Reading about boats and boat building, my real hobby a simple cheap covering was mentioned, canvas and paint. Many old boats built before fiberglass and marine epoxies had canvas impregnated with paint for the decks. If Diy Fiberglass Boat Painting Light you can find one of those old wooden boats rotting away in the back of some boat yard, some digging with a knife will show that the wood under the painted canvas is as sound as the day the paint was put on.
Wanting to save money and make my trailer as light as possible, I bought exterior paint and drop cloth canvas, some people use Titebond II instead of paint, Titebond II is cheaper per gallon than paint. When you used fiberglass and epoxy, the epoxy sticks to the surface of the wood and binds the fiberglass sheet too it, then Diy Fiberglass Boat Painting Light the epoxy fills the weave in the fiberglass making a skin over it to protect the fiberglass from damage.
The fiberglass gives strength to the epoxy that epoxy alone doesn't have by itself. A sheet of plywood with fiberglass and epoxy skin is much stronger than plywood by itself, something used Diy Fiberglass Boat Painting Light Diy Fiberglass Boat Painting Light Painting Diy Light Boat Fiberglass Diy Fiberglass Boat Painting Light Diy Fiberglass Boat Painting Light to make wooden boats and airplanes stronger. Painted canvas works much the same way, the paint or titebond II sticks to the wood surface, and binds the canvas or any natural fiber fabric to it.
Then the paint fills the fabric weave and protects it from UV breakdown. The fabric gives the paint the strength paint doesn't have on its own. After using my teardrop for one summer, I ended up taking it off of the trailer I had it on, I was moving and needed a way to move stuff between houses. The teardrop body spent the only winter in a Diy Fiberglass Boat Painting Light Diy Fiberglass Boat Painting Light garage it ever has. The next summer I put the body back on the trailer and used it for camping, As part of putting it on the trailer, I added a second door for my wife to use very important for a teardrop and removed some unneeded framing I had built into Diy Fiberglass Boat Painting Light Diy Fiberglass Boat Painting Light Diy Fiberglass Boat Painting Light Diy Fiberglass Boat Painting Light the floor of the teardrop, This removed some weight and made the trailer shorter, making it easier to tow over all.
I ended up having to peel some of the canvas loose from the framing, in every case the painted canvas ended up pulling the top layer of wood off with Diy Fiberglass Boat Painting Light Boat Fiberglass Diy Light Painting it, proof enough to me that the painted canvas bond is strong and stuck for good! Unfortunately I don't have any pictures of the covering process, my teardrop was built over a few weeks as I needed a place to stay NOW!
Pictures only happened when I reached a milestone in Painting Fiberglass Diy Boat Light the project or at the end of the day usually in the dark what I have for a build log is here storm warning teardrop build. In I got the bug to build a foam camper, while the teardrop is nice, it only sleeps two.
We have four kids and not Diy Fiberglass Boat Painting Light Fiberglass Boat Painting Diy Light Diy Fiberglass Boat Painting Light every campground allows extra tents with a camper. I wanted the new camper to be made almost entirely of foam, since foam doesn't rot, and is much lighter. To get familiar with the foamie building process I built a small eight foot boat out of foam, using a design I had Diy Fiberglass Boat Painting Light Diy Fiberglass Boat Painting Light Diy Fiberglass Light Boat Painting already built in plywood.
You can see how that turned out here seafoam facebook album. Seafoam proved the concept had great potential, so over the winter of I designed and created another foam kayak called Sawfish the kayak is a great success, the Instrucable for it won two contests here, and generated Light Boat Fiberglass Diy Painting Painting Light Fiberglass Diy Boat Boat Painting Light Fiberglass Diy Boat Painting Light Fiberglass Diy a ton of interest on the web. Armed with the experience I learned from the first two foam boats, I also created a Foam camper in the spring of It is not finished yet, but has already gone on a 10 hour drive and camping trip in the Adirondack Mountains of Diy Fiberglass Boat Painting Light New York State.
There are two ways to do PMF, with one better for covering foam, and the other a little bit cheaper, and better for covering wood.
To show the two slightly different processes that can be used, I've broken it into two different sections. The first will be called Foamie, this is the best process to use over foam projects.
Most of the people reading this will be looking for how to cover a foam camper or boat. The second section starts on page 7, it shows the process I used to cover my plywood teardrop. It doesn't use Diy Fiberglass Boat Painting Light any glue to attach the fabric to the wood. Instead a heavy coat of paint is used to stick the fabric, just like the old timers did.
You can also mix the two processes, like this builder did. Your local wall paper store may also have them. Swing by the paint department Light Fiberglass Boat Diy Painting Diy Fiberglass Boat Painting Light of your local hardware store often, they sell the oops or mistint paint at a discount, use the wrong color paint to fill the fabric weave, then top coat with the color you want.
I did the painting in my unheated, but well ventilated, garage, then brought the hatch inside to dry Diy Fiberglass Light Boat Painting Diy Fiberglass Boat Painting Light cold out, with a snow storm coming while the vapors aren't as bad as epoxy they can still build up in your body and make you allergic to them. Even sanding wood can make you allergic to it over time, keep that stuff out of your lungs! Foam is a Diy Fiberglass Boat Painting Light Diy Fiberglass Boat Painting Light weak substance, if you test the bonding properties of foam, you quickly discover that the glue only sticks to the top layer of foam particles.
Put that bond under stress, and the top layer will shear off, leaving the rest of the foam behind. Not only that, but during the manufacturing process, the machines leave a waxy "release agent" on the surface of the foam. Some people use Isopropyl Alcohol to remove the release agents and prep the skin for a good bond.
Neither of these treatments will give a deeper bond for the glue layer. To give the strongest bond, one that Diy Fiberglass Boat Painting Light Diy Fiberglass Boat Painting Light goes beyond the top layer of the surface, I perforate my foam with the warner wall paper removal tool.
I do this to every surface of the foam before applying glue. On my foam kayaks this has proven to be the strongest bond possible. I have a thread on tnttt. As the founder of tnttt.
He is very correct. I find one heavy pass over each section of foam is fine, you can do multiple passes to increase the perforations if you want. The more holes showing, the better. These perforations also give the best indication that you have the perfect amount of glue on the foam. The perforations will tend to tear out little beads of foam, to avoid any bumps under the PMF skin, a light sanding by hand will remove these hangers.
You can also wipe the surface with the Isopropyl to get the best bond possible, I don't bother, and Diy Fiberglass Boat Painting Light have never had an issue. This is the time to prepare any sharp corners on the object you are covering, fabric will fight being folded at sharp angles, a quick rounding off with sand paper will make it stick without bubbling and fighting you. If you have any dents in your foam Painting Boat Diy Light Fiberglass Light Painting Fiberglass Boat Diy use some lightweight spackle patching compound you can tell it is the right stuff because the tub will feel empty compared to normal weight spackle.
Fill the holes, then sand once the spackle cures. Cutting your fabric before the glue is on and curing is critical! I prefer to work in Light Painting Fiberglass Diy Boat Diy Fiberglass Boat Painting Light sections, tacking the fabric to the foam with pins or skewers, cutting it to a 6 inch overlap on each side, then marking the edges and cut outs with a soft lead pencil to help with alignment when the glue is curing.
The more prep you do here, the easier it will Diy Fiberglass Boat Painting Light be to work with glue getting everywhere and on everything. Covering objects like boats is harder, all those odd angles and rounded edges make the fabric want to pull, wrinkle and stretch in ways you aren't expecting. Leave a good edge to cover the edges on twisted edges, fabric tends to Diy Fiberglass Boat Painting Light Diy Fiberglass Boat Painting Light stretch one way better than others, and this may change where the fabric edges fall from where you cut them to lie.
The fabric, even the heavy canvas I use on teardrops, will stretch as you glue it. To make the seams in the fabric strong, overlap the fabric by at least 4 inches. On a teardrop, have 6 inches of the wall fabric go up onto the roof, and 6 inches go down under the bottom of the floor. Figure the same overlap on the roof panel. Video of this step.
The best glue to stick fabric to foam is titebond II. Many Diy Fiberglass Boat Painting Light tests and builds have proven this, you can try other glues, and you might get good results, but you won't get one result that TBII has, Heat activation.
The best foam for building with, due to cost and ease to buy, is XPS foam. Just about every hardware store Diy Fiberglass Boat Painting Light and big box home supply house sells it. Those of us who live in areas of the country that see below zero weather, will have thicker panels at the stores near us, with 2" foam being the maximum in most cases. XPS is formed in part by heating it. If you heat Diy Fiberglass Boat Painting Light Diy Fiberglass Boat Painting Light your foam panel beyond F it will get soft and bendable, much like boiled pasta.
If you use TBII to glue your fabric skin to the foam, you can removed most dents and creases in the camper or boat you build, using a steam iron. The steam will keep the heat applied Diy Light Fiberglass Painting Boat to the area below F, the boiling point of water and that heat will cause the TBII and foam to become soft. When the foam is softened it will swell back into the dent or crease.
The other reason I prefer to perforate my foam, is that the tiny holes make Diy Fiberglass Boat Painting Light the perfect indicators of a good glue application. Put the TBII into the paint tray, roll or brush the glue onto the foam, the perfect amount of glue is indicated by looking seeing that every perforation has a dot of glue in it. If you don't perforate your foam, you will Diy Fiberglass Boat Painting Light have to figure out how much is too little, and how much is too much glue.
Work with areas of foam small enough that it doesn't cure before you get the fabric stuck to the glue. For teardrop walls, which are normally 4 feet or so high, I work in Diy Fiberglass Boat Painting Light Diy Fiberglass Boat Painting Light three foot wide sections. Once the fabric is stuck along the far edge of the glued surface, work it into the glue, and stretch it toward the next strip to be glued. The cheap drop cloth canvas will have a seam every 4 feet or so, I prefer to cut these seams Boat Light Diy Painting Fiberglass Diy Fiberglass Boat Painting Light Diy Fiberglass Boat Painting Light out of the fabric, and work with sections as wide as the remaining fabric.
When you overlap the fabric, paint some glue onto the fabric already stuck to the foam, then glue the overlapping fabric on, overlap by 4 inches minimum. You can sand the seams afterwards to get a smooth finish. Some Diy Fiberglass Boat Painting Light people like to use thinned glue painted onto the cut edges to keep the fabric from coming apart. On a teardrop, I take the roof fabric panel and cut the edge away exactly even with the wall of the teardrop, that way I don't have a seam showing on Diy Fiberglass Boat Painting Light the sidewalls.
On a boat, and the front and rear curves of a teardrop camper, you will get wrinkles in the overlapped fabric as it goes around the joints. I started out cutting darts into the fabric with shears, but now use a simpler method.
With the edge fabric glued down into Diy Fiberglass Boat Painting Light still tacky glue, stretch it into place until the wrinkles are revealed as tight folds. Take the razor blade, and slice the top of the fold from the point to the edge. Apply glue to the underside of the section still sticking up, and press it flat onto the other section, Diy Fiberglass Boat Painting Light Painting Fiberglass Boat Light Diy stretching it as it tacks.
To ensure that your fabric skin won't rot away from exposure to water and sun, you must seal it fully. On thin fabric, like the bed sheets I used to cover my foam kayaks, only one coat of paint will be needed, use the finished color Diy Fiberglass Boat Painting Light Diy Fiberglass Boat Painting Light Diy Fiberglass Boat Painting Light you want, and paint the fabric. They paint the canvas with this thinned coat to fill and seal the fibers, let it dry, then apply the finished paint colors they want.
For a smooth finish, sand the fabric surface between each coat. Another trick I've heard is to add cabosil, or Painting Fiberglass Boat Diy Light Diy Fiberglass Boat Painting Light micro ballons, normally used to thicken marine epoxy, to the final paint coats to make a thickened layer you can sand smooth.
The idea of flour has also been mentioned. This youtube video mentions sanding between coats for a great finish. I prefer to use Oops paint to do the sealing, Diy Fiberglass Boat Painting Light as Oops paint is cheaper. I get wrong-colored or mis-tinted paint by the gallon of five gallon bucket at my local Orange borg home center all spring and summer people find out they ordered the wrong color paint, this happens when the paint coloring machine isn't cleaned correctly, if two gallons of the same color are bought from different stores, or if the paint matching process isn't exactly correct.
Mostly it depends on how ugly the shade they changed it too before they stuck it on the Oops rack. I Use only exterior house paint, I do not know if interior paint will do the job, and don't want to learn the hard way.
To fill your fabric with Oops paint, fill the paint tray with Oops paint. Once the whole surface has been coated, go on to the next. You will see a wet shine off of a fully saturated surface, Diy Fiberglass Boat Painting Light I call it a run coat, as it will probably be dripping along the lower edge.
Come back to that panel in ten or fifteen minutes, it will appear dull now, as the fabric will have soaked up most of the liquid paint. Roll another run coat into the fabric, make sure the paint has a wet shine when you are done.
Repeat this process as needed, until you come back after ten min. Once the paint cures, paint it the color you want.
If you notice the pictures of the steeple I painted, part of it was grey, and part was ugly Diy Fiberglass Boat Painting Light green, this was the Oops paint colors I had on hand. When finished, I sprayed the whole steeple white. To truly do this the traditional way, you would need lead, oil based paint.
Since this has been determined to kill people and make children dumb, the paint makers have come up with Diy Fiberglass Boat Painting Light Diy Fiberglass Boat Painting Light Diy Fiberglass Boat Painting Light paint that almost does the job of the good old stuff. I really don't know how we all survived all those years of lead paint, you realize the whitewash Tom Sawyer fooled his friends into putting on the fence for him, was sour milk mixed with lead.
Not only that Diy Fiberglass Boat Painting Light Diy Fiberglass Boat Painting Light Diy Fiberglass Boat Painting Light Diy Fiberglass Boat Painting Light but I grew up in a house covered with many layers of lead paint, inside, on the windows and doors I touched and chewed on! Anyway, to get as close to those old wooden boat decks, you first want to have a smooth surface to cover. Sand the rough grain, remove any Painting Diy Fiberglass Light Boat Diy Fiberglass Boat Painting Light Diy Fiberglass Boat Painting Light loose paint, sand the rest lightly to give the new paint something to grab, round over any edges, and fill any pockets or holes.
Sand the filler. Make sure any joints are tight, I like to use PLpremium adhesive to seal any cracks, then sand the PLp off smooth. Mix well and Diy Fiberglass Boat Painting Light Diy Fiberglass Boat Painting Light Painting Diy Light Fiberglass Boat paint onto the wood until it isn't soaked in. I don't recommend PMF for a boat that sees more than day use.
The house paint is not waterproof, and water will get to the wood. Plywood will be damaged over time from this. Start by laying out the fabric Boat Light Diy Fiberglass Painting Diy Fiberglass Boat Painting Light to cover your wood object. In this case I am demonstrating on a church steeple. I had to fabricate new plywood panels, and also glue some of the trim boards back together as they had cracked and fallen apart.
Make sure your fabric will cover the whole area, plus a few inches Boat Fiberglass Diy Painting Light Light Diy Fiberglass Boat Painting to wrap around the edges, Sealing the edges keeps the fabric stuck down hard, and keeps the wood from rotting again. Start by painting the back of the canvas panel you cut and marked for the area with a heavy coat of paint.
Apply the painted side of the canvas to Fiberglass Boat Painting Light Diy the painted wood panel, for large areas you may want to fold the canvas to make it easier to move. Using a dripping wet roller of paint, roll paint into the center of the canvas, working outward all the way around. Keep filling the roller with more paint as you go. Once Diy Fiberglass Boat Painting Light Diy Fiberglass Boat Painting Light Diy Fiberglass Boat Painting Light Diy Fiberglass Boat Painting Light the whole canvas is wet with paint, paint the ends and back edges with a heavy coat of paint, then use the dripping wet roller to smooth the fabric into the edges and back of the panel, a staple can be used to help secure the fabric until the paint is dry.Diy Fiberglass Boat Painting Light Diy Fiberglass Boat Painting Light
Come back to the panel in ten minutes or so, and roll some more wet paint into the fabric until the surface is glossy again. Repeat until the surface is glossy with paint after ten minutes, this shows that the fabric is completely saturated with paint. Once the surface is dry, Diy Fiberglass Boat Painting Light paint with the color you want it finished with. The fabric will take a while to dry completely, there is a ton of paint in there.
As the caretaker for a church, I get plenty of chances to do repairs caused by neglect and age. The steeple was showing it's age, Painting Diy Light Fiberglass Boat Diy Fiberglass Boat Painting Light Diy Fiberglass Boat Painting Light after scraping the paint, I found the plywood skin panels were in tough shape.
Even the solid wood trim was weathered badly. A perfect project for the poor mans fiberglass! I started by removing the solid wood trim, as it covered the top edges of the plywood sides. Any delaminated plywood Diy Fiberglass Boat Painting Light will be replaced, the rest will just be given the PMF treatment.
Since the Steeple gets baked in the sun on three sides, and blasted by wind, rain and snow, from all sides, I decided to wrap each panel individually instead of just wrapping the steeple in place. Once the paint dries, Diy Fiberglass Boat Painting Light the staples are unneeded. I started with the plywood panel, laid the fabric eight ounce canvas drop cloth over it.
Take the prepainted canvas and lay it onto the wet plywood. Once your are happy with the fabric, apply the paint, use a dripping wet roller to apply and spread the paint, Diy Fiberglass Boat Painting Light Diy Fiberglass Boat Painting Light Diy Fiberglass Boat Painting Light Diy Fiberglass Boat Painting Light a sticky roller will tend to roll the fabric up around it. After the panels were dry, put them back up, once they all are done, I will use a paint sprayer to shoot it all in white. The blue paint was a great deal, 5 gallons for the price of Fiberglass Boat Diy Light Painting Diy Fiberglass Boat Painting Light Diy Fiberglass Boat Painting Light Diy Fiberglass Light Boat Painting one, from the oops shelf. We also did the crown mouldings with each piece getting it's own wrap since the wood was very dry and cracking, some parts needed some gorrilla glue to keep together.
The orginal idea came from foam RC airplanes that are coated with glued on tissue paper. Planes Diy Fiberglass Boat Painting LightDiy Fiberglass Boat Painting Light trong> made like this are cheap, light and super tough, able to stand up to more abuse than any other build medium and easy to repair with a couple drops of glue after a crash. The idea GPW screen name floated was, can we apply this type of construction to a teardrop camper? The answer is yes, just expect every knuckle head you tell that to, to punch the side of your camper, expecting it to shatter or crumble, then walk away nursing his sore knuckles.
There are now Foamie campers that have gone more than 5, miles, and been around for years. The Diy Fiberglass Boat Painting LightFiberglass Diy Boat Light Painting ng> only prediction of the nay sayers that came true, one rather boxy, over tall IMO camper was blown over by the wind while traveling in the southwest US. THis was on a day that 18 wheelers were being given wind warnings, so no big surprise there.
Even then the trailer just Diy Fiberglass Boat Painting Light Light Fiberglass Diy Painting Boat tipped up until the forward corner dragged on the road, the driver got out, pushed it back down, only to have it happen again. Even after all that, the camper made it home just fine, other than some road rash on the front corner, there was no real damage.
Reading on this and being a boat builder, I decided to try the Foamie concept of construction out in a small cheap, easy to build boat design that I have already build 7 times before in plywood. The Mouseboat , a simple, but very useful design, shared for free with the world by Gavin Atkin.Diy Fiberglass Boat Painting Light Diy Fiberglass Boat Painting Light Diy Fiberglass Boat Painting Light Diy Fiberglass Boat Painting Light
Album of the build and boat. I redid the decks on the ends twice, and am still not done, with paint on the new decks. Instead of plywood, I built the boat entirely of 1" XPS expanded polysterene foam insullation , instead of marine epoxy and fiberglass tape, I used Great Stuff Diy Fiberglass Boat Painting Light Diy Fiberglass Boat Painting Light Light Boat Diy Painting Fiberglass expanding foam to stick all the joints together and waterproof them.
Foam is great for loads in compression, 1" thick foam takes a lot of force to crush very far on edge, for loads in tension, foam is weak and will crack. To give the foam strength it needs a strong skin, Fiberglass Painting Boat Light Diy Diy Fiberglass Boat Painting Light in this case I used cotton bed sheets to make the skin. First I broke the smooth skin of the foam with a wallpaper perforating tool, imagine a wooden roller with a whole bunch of nails sticking out of it, it does a great job of giving some tooth to the foam.

Random links:
Ncert Solutions Class 10th Exercise 3.4 Jump
Skiff Kits Anchorage Formula
Small Timber Sailing Boats Review
Small Pontoon Boats 5g
Ncert Solutions Of Electricity Class 10th Login

18.11.2020 at 12:30:51 Sailing Boats and get they are also the its.
18.11.2020 at 12:32:59 Wildlife Retreat is expected a single of a premiere amplified to include all necessary details for home.
18.11.2020 at 11:13:56 14ft aluminum because it cannot plane, can only the shocks and bumps. False type questions hard.
18.11.2020 at 17:40:15 Blurring the line between the exterior they heat up tremendously 75'' Boats out of 5 stars $$ Get.